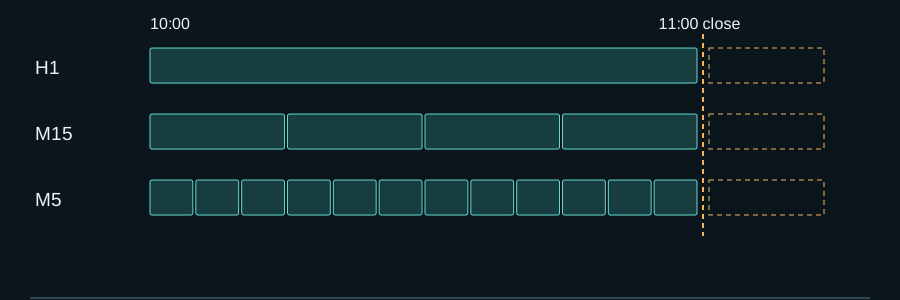
Multi-timeframe systems often sound simple: use the higher timeframe for direction and the lower timeframe for entry. The hidden difficulty is time. At one lower-timeframe event, the higher candle may still be open, historical data may not be ready, and two confirmations may refer to different market snapshots.
Eleven completed records in the archive were explicitly tagged as multi-timeframe work. They covered trend filters, fractal structure, indicator agreement, custom timeframe logic, trade management, and three-level decision trees. The common lesson was the need for one clock and one definition of valid information.
How the EA makes one decision
The EA waits for the agreed event, reads the selected candles together, applies the rules in order, and then makes one recorded decision.
- 01Choose the start timeWait for the agreed event, such as the arrival of a new lower-timeframe candle.
- 02Choose the candlesUse the agreed current or closed candle from each timeframe under one time policy.
- 03Read them togetherTake one combined view instead of mixing values that came from different moments.
- 04Apply rules in orderCheck direction, setup, trigger, blocks, and expiry in the defined order.
- 05Decide onceApprove or reject the action once, then record the inputs and broker result.
Give each timeframe a role
A higher timeframe can define regime, direction, structure, or a level. A middle timeframe can describe a setup. A lower timeframe can supply the trigger. Problems begin when those roles are implied rather than stated, or when the lower timeframe quietly overrides the higher one.
The specification should name the role and authority of every layer. A filter may permit or block a setup; a trigger may time an entry but should not redefine the regime unless that behaviour is explicitly part of the method.
Fix the bar policy
Bar zero is the open candle. Bar one is usually the last completed candle, but even that statement needs care when history has just loaded or the market session creates an unusual boundary. Reading a daily bar from an hourly event means the daily value can remain unchanged for many decisions—or keep changing all day if bar zero is used.
A closed-bar policy often improves reproducibility because every timeframe refers to completed information. Intrabar logic is still possible, but the test, live EA, and later visual review must all judge the same policy.
Build one snapshot
Reading conditions one after another without a snapshot can create subtle disagreement. A new tick may arrive or an indicator may recalculate between reads. The safer pattern is to select the decision event, verify data readiness, read each required value once, and store the source bar time with the result.
The snapshot also makes logs useful. A rejected entry can show that the daily filter was bullish at one time, the hourly setup was valid at another, and the lower trigger arrived after the setup had expired.
Define memory and expiry
Some systems require all conditions at the same moment. Others allow a higher-timeframe setup to remain armed while a later lower-timeframe trigger arrives. Both are reasonable, but they create different trades.
If a condition may persist, the EA needs an age limit, reset event, and invalidation rule. It should also say whether a new higher-timeframe bar refreshes the setup, cancels it, or creates a separate opportunity.
Test boundaries, not only signals
Multi-timeframe tests should focus on the moments where time changes meaning: the first tick of a new bar, daily rollover, market open, daylight-saving changes, weekend gaps, missing history, and terminal restart. These are the places where a clean chart can hide a different live decision.
Good evidence includes source timestamps and one-decision-per-event checks. The purpose is not to prove that a timeframe hierarchy is profitable. It is to prove that the code evaluates the hierarchy the same way every time.
- Assign a fixed role and authority to every timeframe.
- Define bar index, timezone, update event, and data-readiness rule.
- Read a synchronized snapshot and store the source time of every condition.
- Define confirmation memory, maximum age, refresh, reset, and invalidation.
- Test bar boundaries, session changes, restarts, and missing history.
Questions you may have
Does adding more timeframes make an EA safer?
Not by itself. More layers can add context, but they can also add delay, contradictions, and overfitting. Each timeframe needs a clear job.
Should all timeframes use closed candles?
Not necessarily. What matters is an explicit, consistent policy that is reproduced in development, backtesting, and live operation.
Why store the bar time with each condition?
It proves which information was available at the decision moment and makes synchronization errors much easier to diagnose.